Join the Sensor Network
opensensor.space is a community-driven sensor network. Deploy sensors, share open data using open standards, and help build comprehensive environmental monitoring across the globe.
How to Participate
- Deploy your sensors - Follow the setup instructions below
- Choose your storage - This is the only 3rd party service required. You can use:
- Cloud: AWS S3, Google Cloud Storage, Azure Blob, Wasabi, Hetzner, etc.
- Open Data: Source Cooperative (recommended for public data)
- Local / Airgapped: MinIO, Ceph, or RustFS for local edge networks
- Register your station - Use our registration form below
- Share your insights - Contribute dashboard improvements or new sensor implementations
Register Your Station
Ready to add your sensor station to the network? Use our registration form to submit your station details.
Requirements:
- A GitHub account is required to authenticate and submit the registration.
- Your Object Storage Bucket must be publicly accessible so the network can read your data.
1. Hardware Requirements
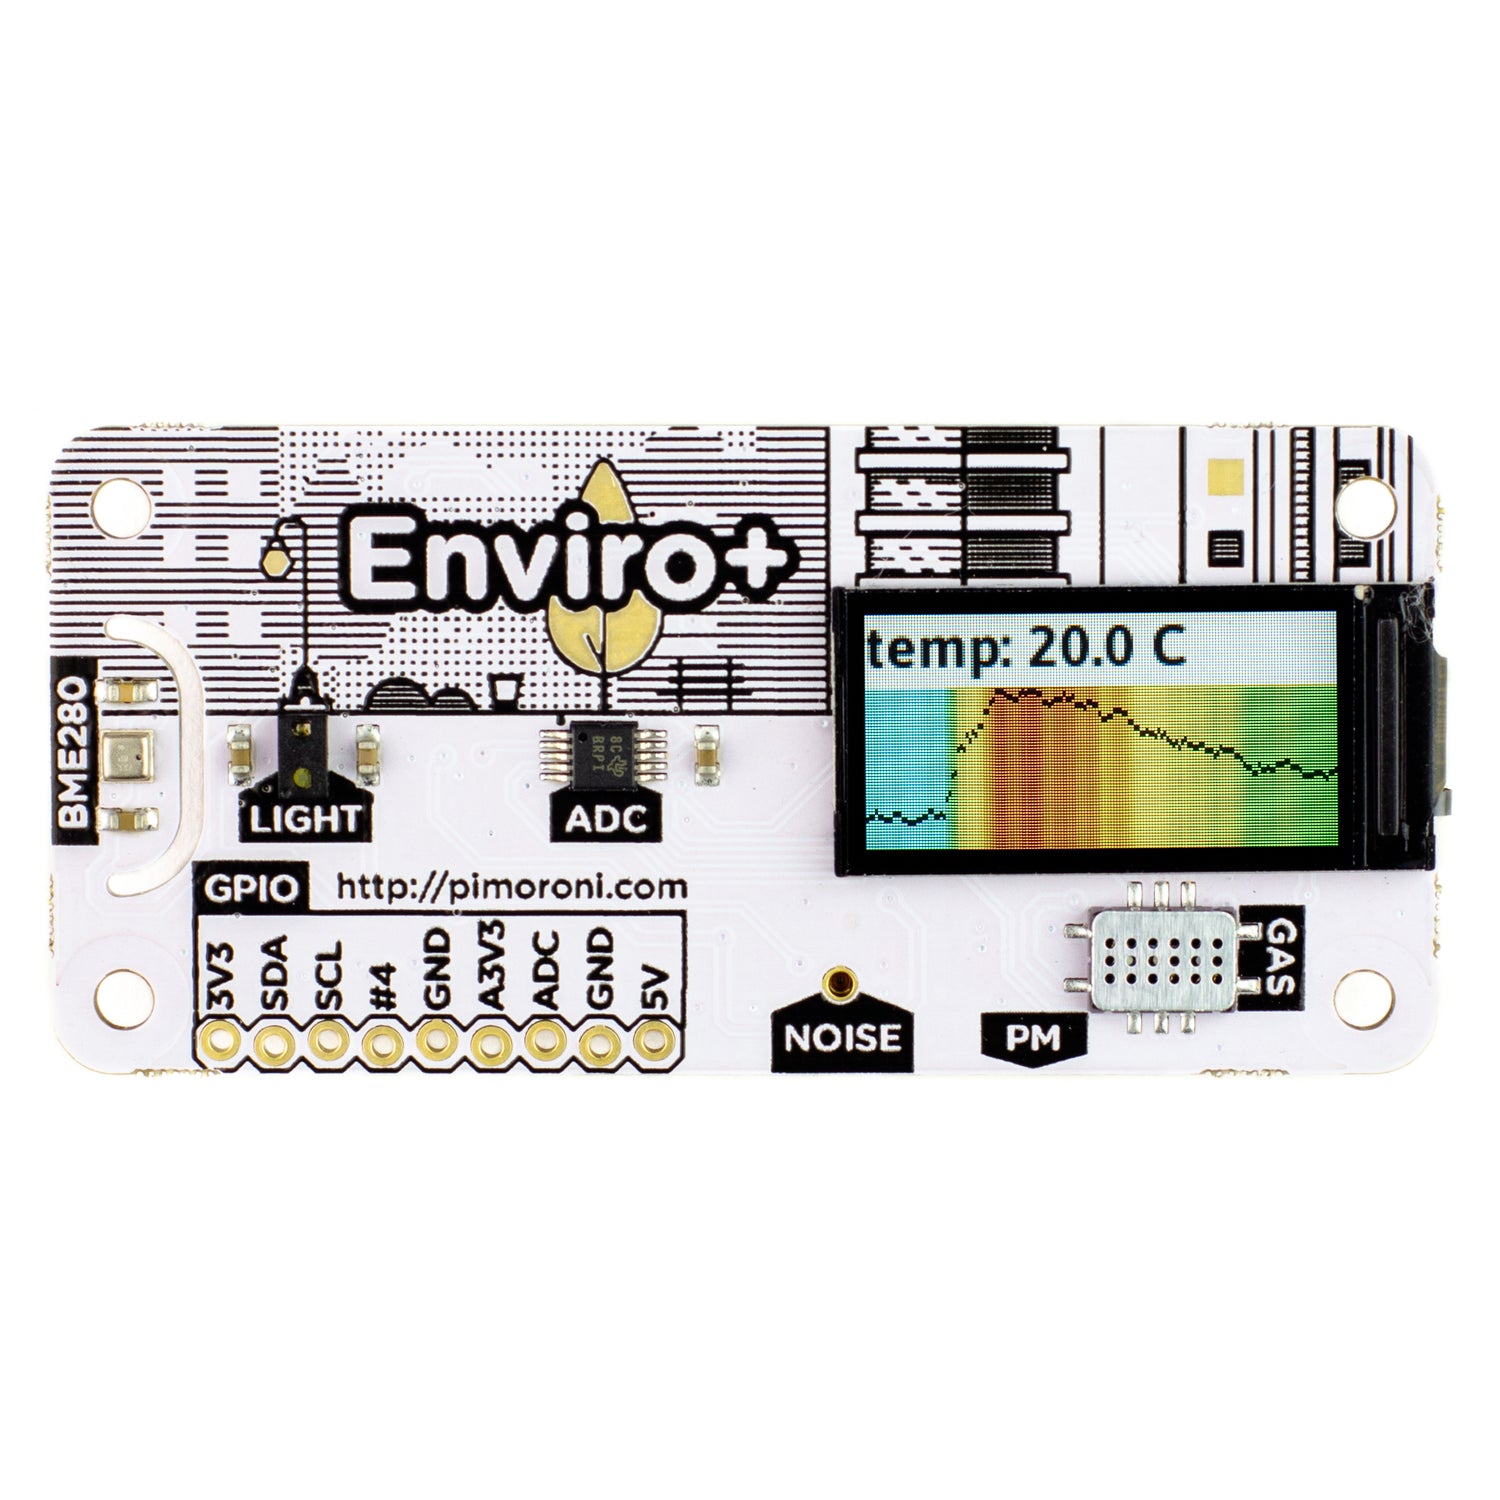
Recommended Setup (Enviro+)


Custom Deployments
You can adapt this architecture to any Python-capable device:
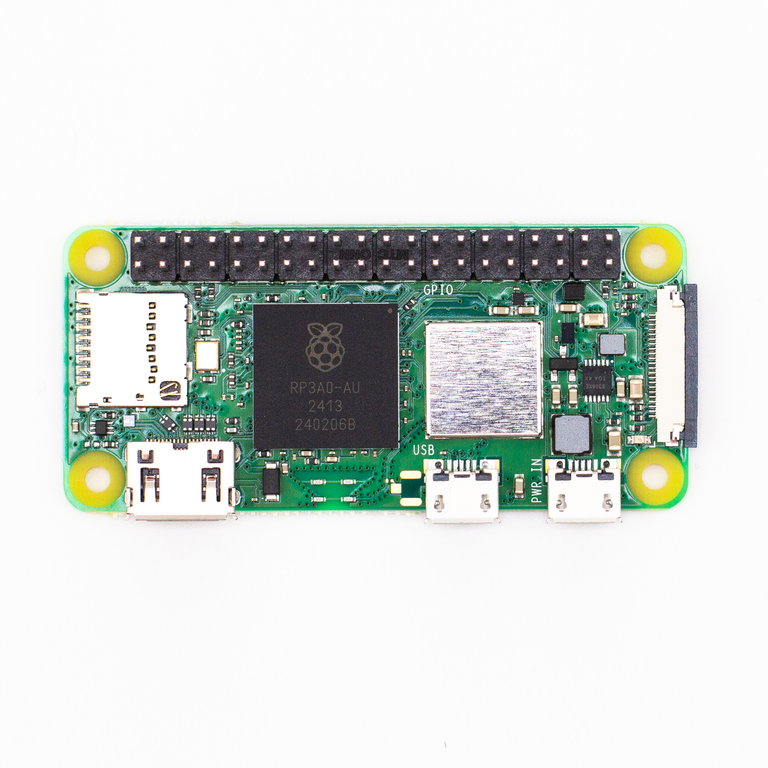
- Raspberry Pi (Zero 2 W, 3, 4, 5)
- NVIDIA Jetson (Nano, Orin)
- ASUS Tinker Board
- Any Linux SBC with Python 3.12+ support
2. Operating System
Follow this step-by-step guide to install and configure Raspberry Pi OS using Raspberry Pi Imager v2.x.x. Download it from raspberrypi.com/software.
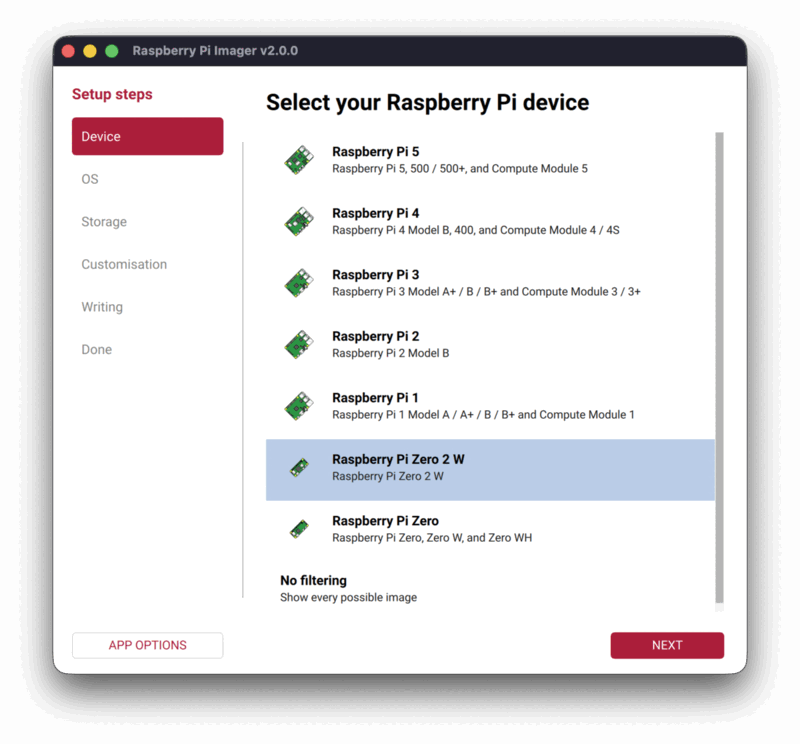
Step 1: Select Your Device
Open Raspberry Pi Imager. The setup wizard guides you through each step using the sidebar on the left. First, select your Raspberry Pi model from the list. For this tutorial, we're using Raspberry Pi Zero 2 W.
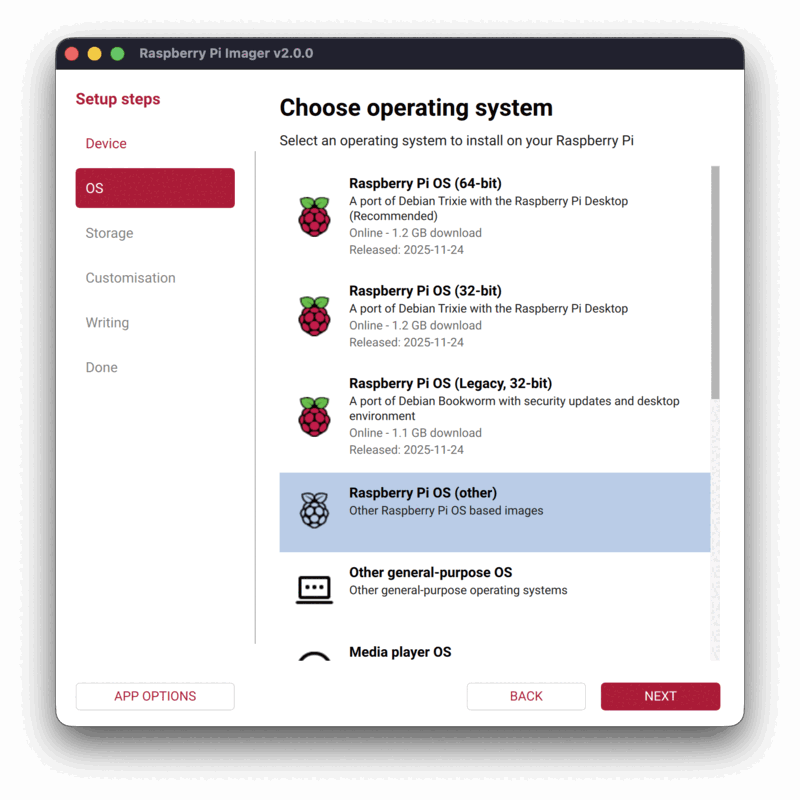
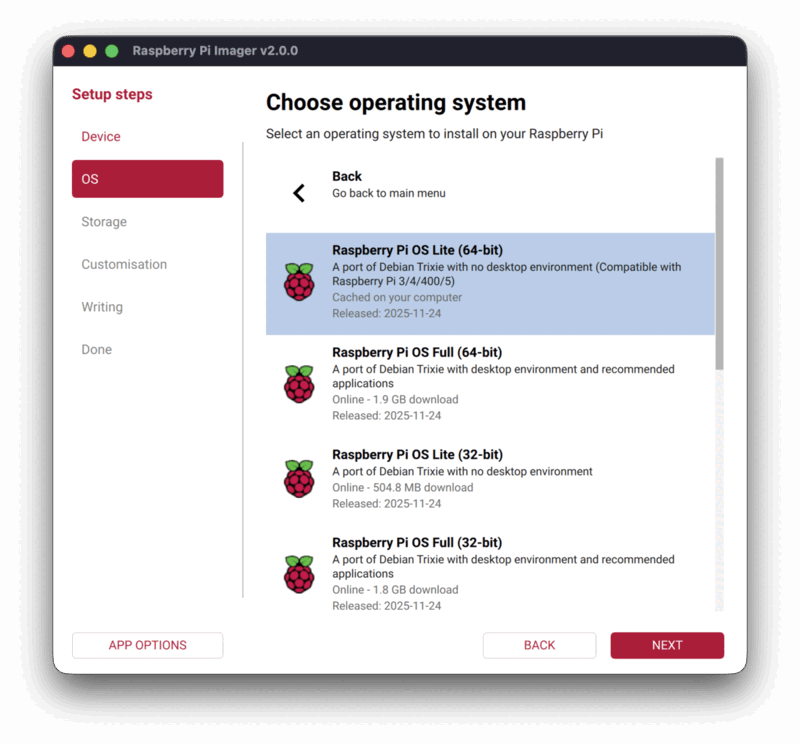
Step 2: Choose Operating System
Click on the OS step in the sidebar. You'll see several options including Raspberry Pi OS (64-bit) with desktop and other variants. Select Raspberry Pi OS (other) to access the Lite versions.
Step 3: Select Raspberry Pi OS Lite (64-bit)
Choose Raspberry Pi OS Lite (64-bit) - a port of Debian Trixie with no desktop environment. This is ideal for sensor stations as it uses fewer resources and runs headless. The image is approximately 500MB and will be cached on your computer after the first download.
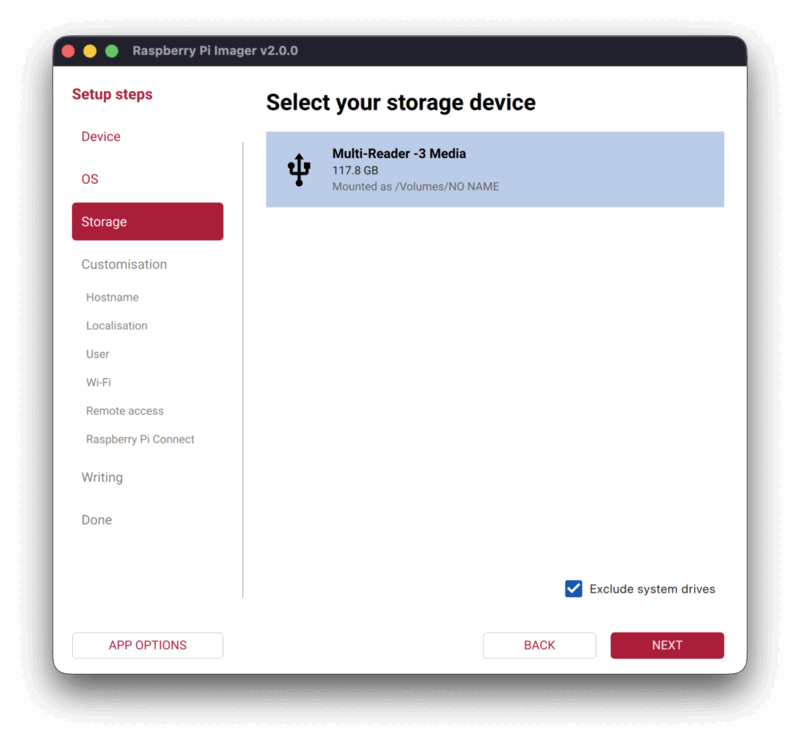
Step 4: Select Storage Device
Insert your microSD card and click on the Storage step. Select your SD card from the list. The "Exclude system drives" checkbox is enabled by default to prevent accidentally overwriting your computer's drive.
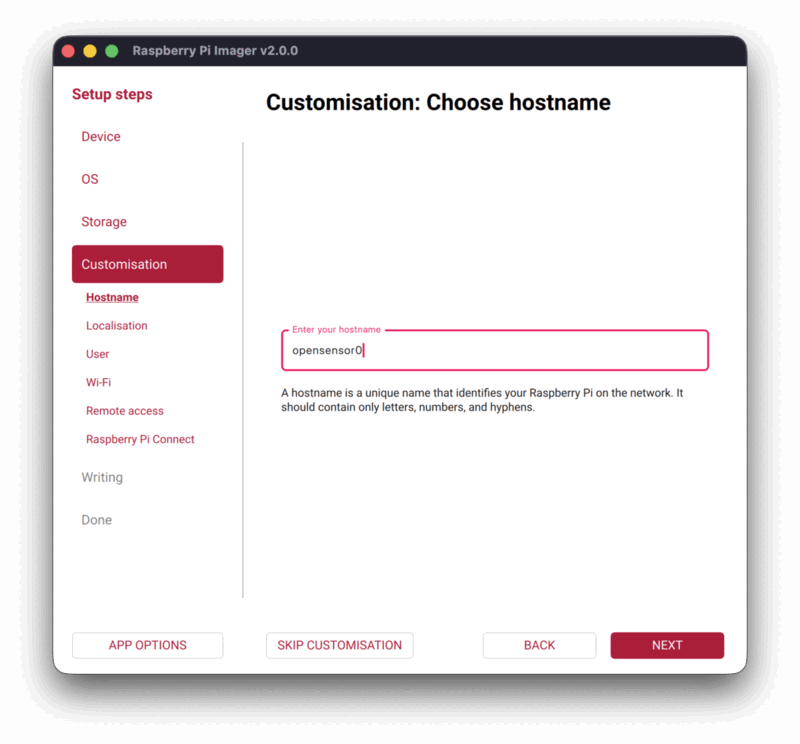
Step 5: Configure Hostname
The Customisation section is where you configure your headless setup. In the Hostname step, enter a unique name for your Pi (e.g., opensensor01). This allows you to find it on your network as opensensor01.local. The hostname should contain only letters, numbers, and hyphens.
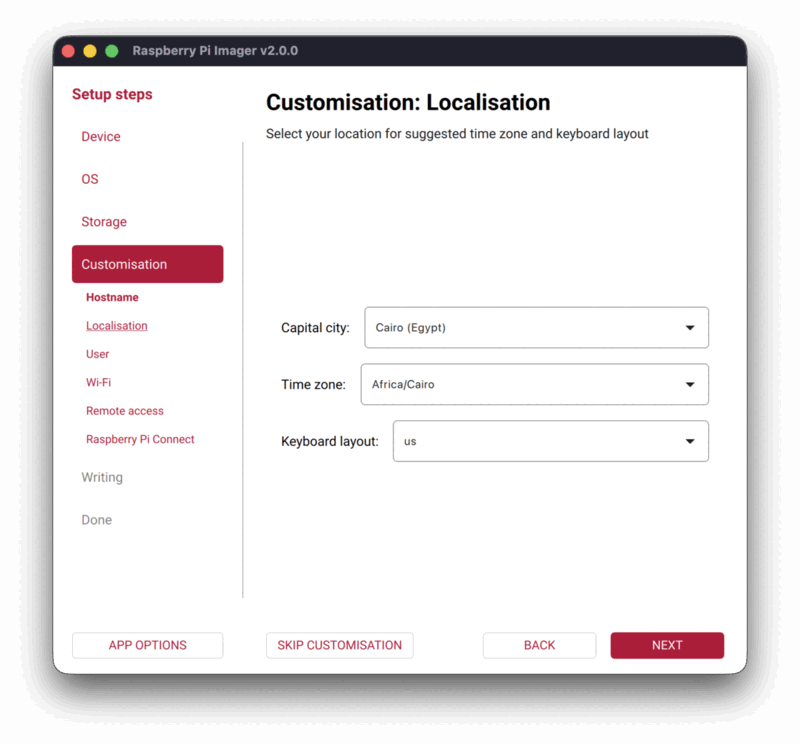
Step 6: Set Locale and Timezone
In the Localisation step, configure your regional settings:
- Capital city: Select your nearest major city
- Time zone: This will be auto-filled based on your city selection
- Keyboard layout: Choose your keyboard layout (e.g.,
us)
Correct timezone settings ensure your sensor readings have accurate timestamps.
Step 6b: Raspberry Pi Connect (Optional)
The Raspberry Pi Connect step allows you to enable remote access through Raspberry Pi's cloud service. This is optional for our setup since we'll use SSH over your local network. You can leave this disabled and click NEXT to continue.

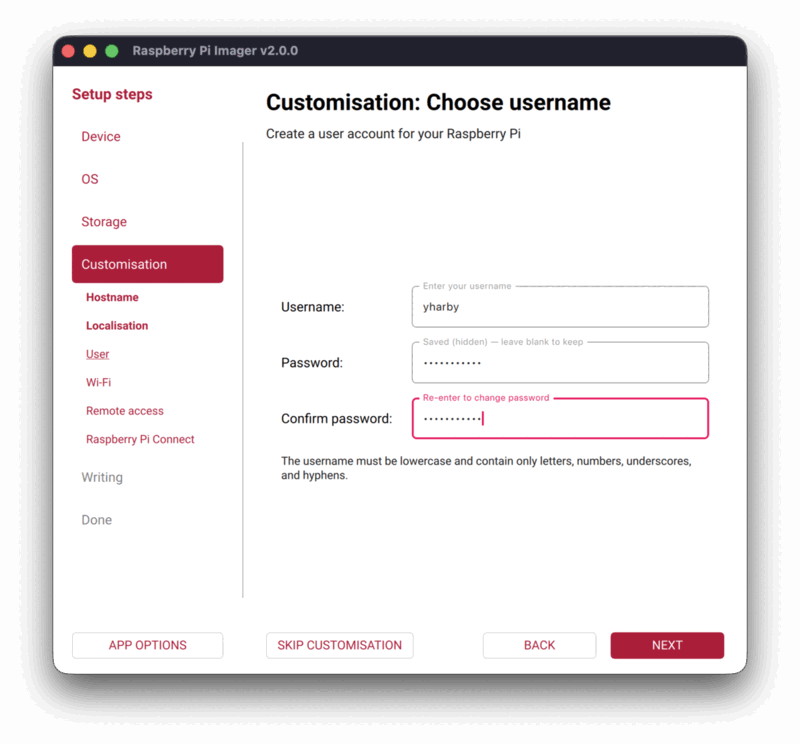
Step 7: Create User Account
In the User step, create your login credentials:
- Username: Enter a lowercase username (letters, numbers, underscores, and hyphens only). Avoid using
pias it's a well-known default that makes your device easier to target. - Password: Create a strong password with at least 12 characters, mixing uppercase, lowercase, numbers, and symbols. Re-enter it in the "Confirm password" field.
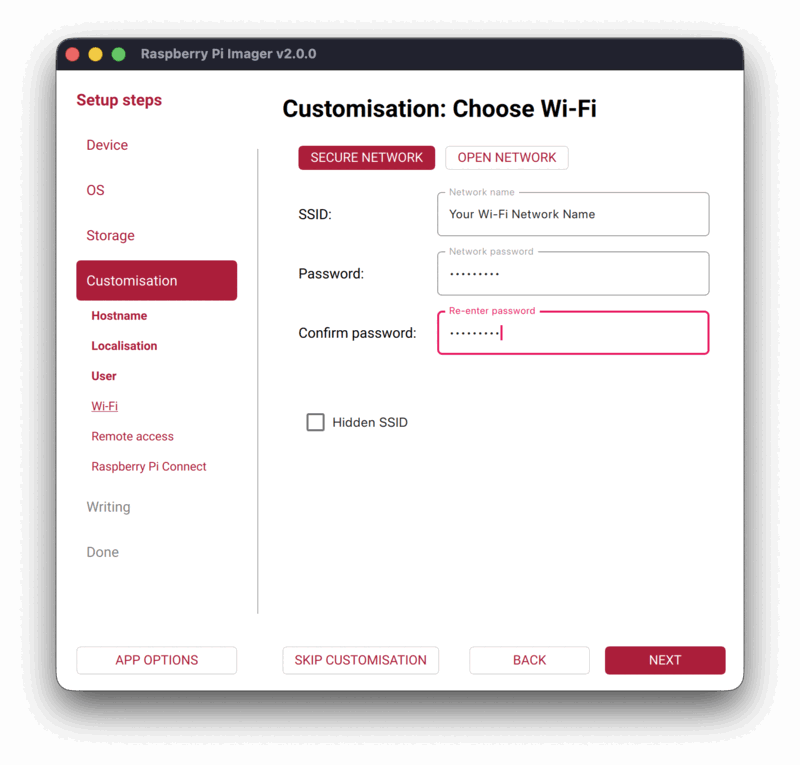
Step 8: Configure Wi-Fi
In the Wi-Fi step, enter your wireless network details:
- SSID: Your Wi-Fi network name
- Password: Your Wi-Fi password (confirm it in the second field)
- Hidden SSID: Check this box if your network doesn't broadcast its name
Choose between SECURE NETWORK (WPA/WPA2) or OPEN NETWORK based on your setup.

Step 9: Enable SSH Access
In the Remote access step, enable SSH to control your Pi remotely:
- Toggle Enable SSH to ON
- Choose your authentication method:
- Use password authentication: Simpler setup, uses the password from Step 7
- Use public key authentication: More secure, uses cryptographic keys instead of passwords
We recommend public key authentication for better security. If you choose this option, you can either paste your public key directly or click BROWSE to select your key file.
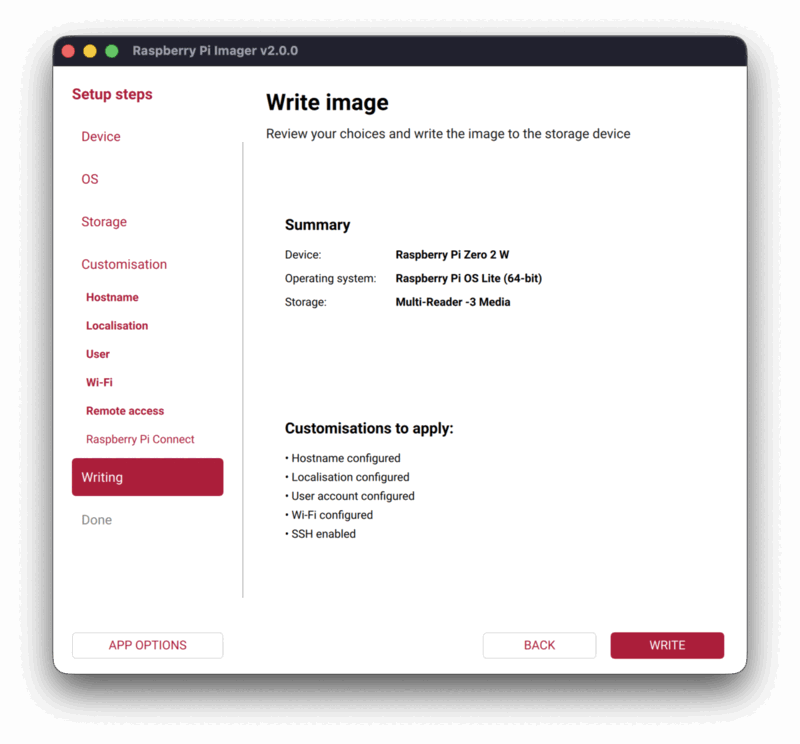
Step 10: Review and Write
The Writing step shows a summary of your choices before writing:
- Device: Raspberry Pi Zero 2 W
- Operating system: Raspberry Pi OS Lite (64-bit)
- Storage: Your selected SD card
- Customisations to apply: Hostname, Localisation, User account, Wi-Fi, and SSH settings
Review the summary and click WRITE to begin.
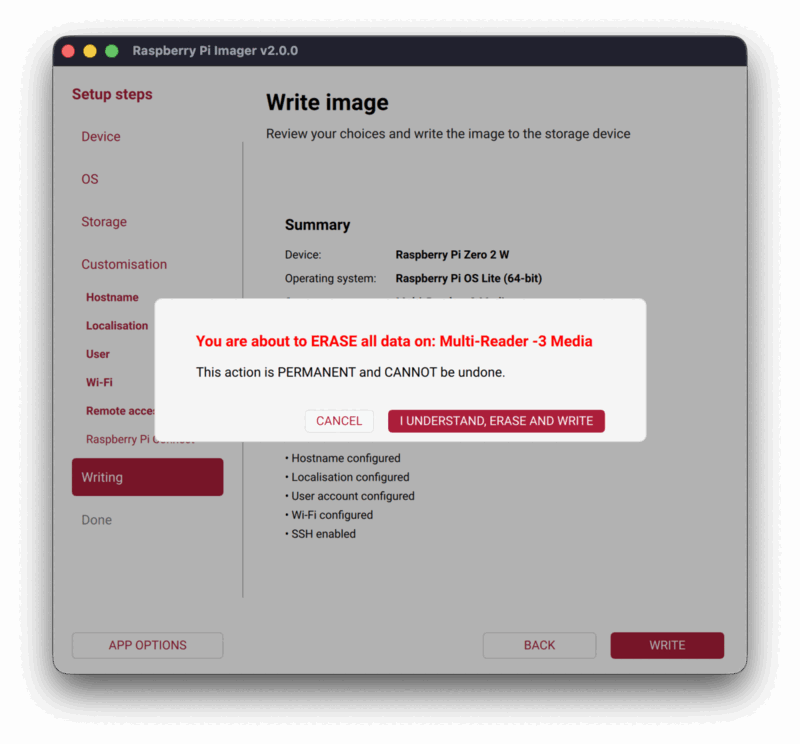
Step 11: Confirm Erase
A warning dialog appears: "You are about to ERASE all data on: [your SD card]". This action is permanent and cannot be undone. Click I UNDERSTAND, ERASE AND WRITE to proceed.
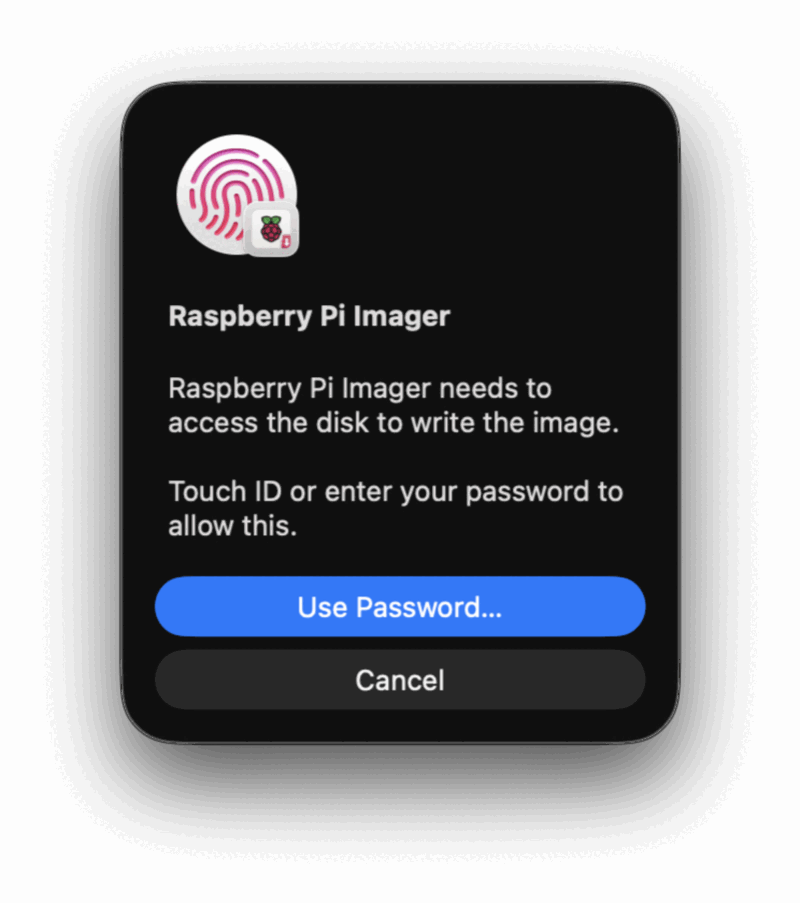
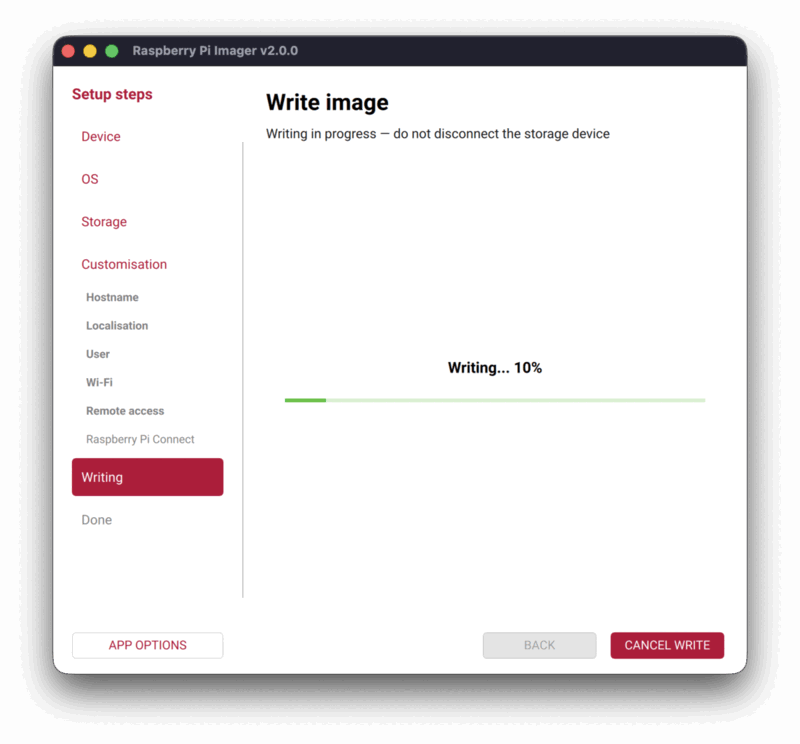
Step 12: Authenticate and Wait
On macOS, you'll be prompted to authenticate with Touch ID or your password to allow disk access. After authenticating, the writing process begins. Do not disconnect the storage device while writing is in progress.
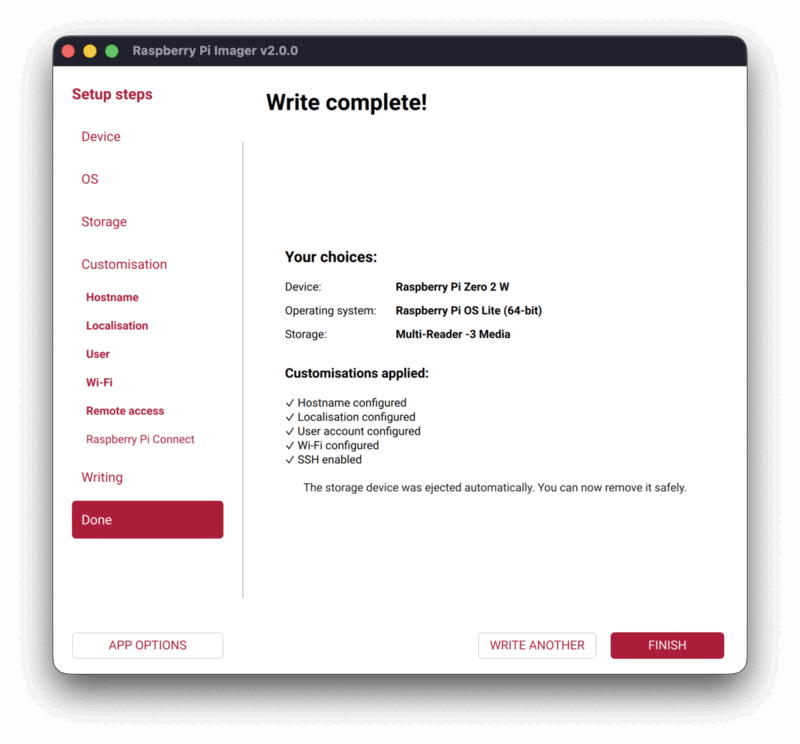
Step 13: Complete
When finished, you'll see "Write complete!" with a summary of all applied customisations:
- Hostname configured
- Localisation configured
- User account configured
- Wi-Fi configured
- SSH enabled
The storage device is ejected automatically. You can now safely remove the SD card and insert it into your Raspberry Pi.
3. Software Installation
SSH into your Raspberry Pi to begin the installation.
We've simplified the installation process to a single command that handles everything: system dependencies, Python environment, and sensor configuration.
One-Line Install (Recommended)
Run this command on your Raspberry Pi:
curl -LsSf https://raw.githubusercontent.com/walkthru-earth/opensensor-enviroplus/main/install.sh | sudo bashThis script will:
- Install system dependencies (git, python3-dev, etc.)
- Install
uv(fast Python package manager) - Install
opensensor-enviroplus - Configure hardware permissions
After the installation completes, reboot your Raspberry Pi:
sudo rebootPost-Installation Setup
After rebooting, SSH back into your Pi and run these commands to verify, configure, and start your station:
Test Sensors: First, verify that your sensors are reading data correctly.
opensensor testConfigure Station: Set up your station ID and storage credentials.
cd ~/opensensor
opensensor setup
Enable Service: Install the systemd service to start data collection automatically on boot.
opensensor service setupVerify Operation: Check the logs to ensure the service is running and syncing.
opensensor service logs -f
System Architecture
For a detailed overview of how the system works, check out the System Architecture page.
Configuration
Configuration is managed via a .env file in your ~/opensensor directory. Key settings include:
OPENSENSOR_STATION_ID: Your unique station UUID.OPENSENSOR_READ_INTERVAL: How often to read sensors (default: 5s).OPENSENSOR_BATCH_DURATION: How often to save files (default: 900s / 15m).OPENSENSOR_SYNC_ENABLED: Enable/disable cloud sync.OPENSENSOR_STORAGE_BUCKET: Your cloud storage bucket name.
Health Monitoring
The system optionally collects health metrics to help you monitor your station remotely. This includes:
- CPU temperature and load
- Memory and disk usage
- WiFi signal strength
- NTP clock synchronization status
These metrics are stored in a separate output-health/ directory with the same structure as your sensor data.
Maintenance
Updating the Software
To upgrade to the latest version of the opensensor-enviroplus package, run the following command. This will update the tool and restart the service to apply changes:
uv tool upgrade opensensor-enviroplus && opensensor service restartCLI Commands & Documentation
For a full list of CLI commands, configuration options, and advanced usage, please refer to the official repository:
- opensensor-enviroplus: Documentation for the data collector, CLI, and service management.
Support
If you encounter issues or have questions, please check the issues page on GitHub: